Poolking, your best swimming pool equipment manufacturer and supplier with more than 20 years experience. ![]() Email: sandy@poolking.co
Email: sandy@poolking.co


Sand Filter Setup: Detailed Steps
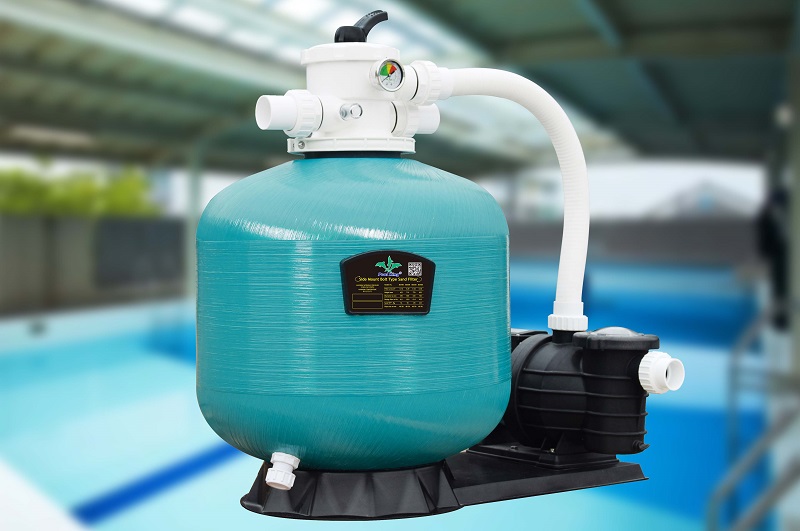
A sand filter is an essential part of your swimming pool. You can connect a reliable filter to the filtration system of your pool. It will help you have clean and hygienic water for swimming during all seasons. The pool water will pass through the sand tank and will catch the debris and other particles. Moreover, it will prevent all these particles from going back inside the pool. The sand filter setup is not challenging to handle. However, it is best to get in touch with a professional to keep the stress away from the mind.
Sand Filter Setup: Detailed Steps
The sand filter is required to keep your pool water clean and clear. If you want to set up the sand filter properly follow these steps:
Step 1
Before you start with the installation, you need to purchase the right amount of sand. It is best to use only high-rated 20 silica sand. You can check with the manufacturer to find out the right amount of quantity. Each product features 150lbs of sand in total. The sand must be of superior quality to give you the best benefits for the pool.
Step 2
There are plenty of pool filters out there and you can choose the best one according to your requirement. While doing the sand filter setup, you can connect it to the pump. The pool water will come directly inside the pool and filter through the sand filter. It will release into the chlorinator before making a comeback into the pool. If you have a pool heater, it will release all the water to the heater before moving to the chlorinator.
Step 3
The pool owners must install the pool water on a certain level. It should remain not more than 6 feet above the pool water level. You can position the pool sand filter along with the piping connections. The multiport valve and drain must remain convenient and accessible for operations. All you need is to place the filter next to the pump.
Step 4
You can connect the pool sand filter to the piping system. It is necessary to assemble the filter first and screw the pressure gauge into ¼ hole. If you don’t prepare the thread, wrap it inside the Teflon tape. You can start it in a clockwise direction but be careful while screwing on the gauge. Moreover, you can use the wrench to make the final turns. While doing the sand filter setup, you should make sure that the drain cap is secure in one place.
Step 5
The next step will be to install the pipe and assemble it inside the tank. You can separate the valve from the pipe within a few minutes. Make sure that the ten laterals that are available at the end of the pipe are rotated well. They must remain at the top position of the tank to work efficiently. However, these laterals are fragile. Make sure that none of them crack or break down easily. All you need is to place the pipe and assemble it inside the tank.
Step 6
When the lateral assembly is inside you must rotate the 10 laterals carefully. It must remain at 90 degrees in its down position. There is a pipe at the center of the opening and you need to tap on it once. It will prevent the sand from entering or clogging the laterals.
Step 7
When doing the sand filter setup, the package of sand filters comes packed with a cardboard sand shield. You can simply place it over the pipe around the opening. It is necessary to pour the sand carefully inside the pool sand filter. Make sure that the laterals are fully covered. The pool owner must have 3 bag units to leave at least six inches of space between the top of the sand and the filter.
It is important to level the sand as you pour it into the pool water. When the pipe remains at the center it will not affect the opening either. If you level the sand correctly and don’t lift the pipe the lateral will be at the bottom of the tank. Many pool owners don’t realize that if they push the pipe back down forcefully it can cause the laterals to rotate.
Step 8
You can lubricate the valve tank with silicone and place it on the other side of the valve. It will be easy to remove the tape from the top of the pipe. When you slip the multiport valve control on the central pipe check the O-ring first.
Make sure it is positioned correctly to keep everything in good control. The next step will be to install the clamps around the tank and valve flange. It is important to loosely tighten the clamp as it makes rotating the valves easy and effective.
Step 9
The next steps in sand filter setup will be to connect the ‘Pump’ port of the multiport valve. It will help discharge the side of the pump without any difficulty. You can seal this connection to wrap up the adapters. When you start it in a clockwise direction it is best to overlap it for the full length of the thread. If you screw the adapter into the ‘pump port tighten it correctly with a few additional turns. Make sure you don’t over-tighten as it can cause the joint to fail.
Step 10
You can cut a short piece of pipe and connect it to the adapter. Make sure that the pipe inside it must be clean. Gluing is not an easy process to handle. All you need is to apply a thin coat of purple primer on both sides of the surface. Both the outside and inside of the adapter must join correctly. Moreover, immediately push the pip inside the adapter. You have to wait for 30 seconds for the glue to set.
Conclusion
The above are the specific steps in sand filter setup. If you want to purchase a new sand filter there are many options available at Poolking. The pool sand filter provides clean and fresh water for swimming. You must maintain the quality of your pool to keep everything in control.

Best swimming pool equipment manufacturer - Poolkin will continue for innovative management and excellent quality. Imagination will subvert the future, intelligent manufacturing will lead the era, that's the motto of Poolking!
PRODUCTS
Contact: Sandy
Email: sandy@poolking.co
Sales Hot line: +86-20-34982303
WhatsApp:+86-13922334815
Add: No. 80, Danan North Road, Dagang Village, Dagang Town, Nansha District, Guangzhou City (temporary business premises)